- 1. Start as early as possible—early April is generally good. If shoots are up only an inch or two, you can still dig or divide it. Smaller, younger plants are better for potting up as there will be less set-back to the plant. Once out of the ground the roots will warm up faster. The main benefit of early digging is that the plant has time to overcome transplant shock and become established, resulting in a happier, better-looking plant in time for the sale.
- 2. You can dig up the whole plant and divide it or chop pieces from the edges of a clump using a spade. If you decide to dig up the whole plant there are various ways of dividing it. You may be able to tease the root apart by hand (e.g. day lilies). A large woody or dense fibrous root will need to be chopped or cut apart using a spade, sharp knife, secateurs or small tree saw.
- 3. Larger divisions are preferable to very small ones, depending on the plant. Avoid potting up very large plants. These can be difficult for people to carry home. Simply create two or more divisions from one plant, we will have more plants to sell. 4. You may need to trim the root ball to fit the pot. Secateurs are perfect for this but sharp scissors may also work. Ideally, there should be a minimum ½ inch space around the root ball, to be filled with potting soil.
- 5. Try to avoid having roots showing or hanging over the top of the pot. This causes the plant to dry out. If the plant ends up sitting a little high in the pot, remove it and trim some of the root off the bottom or use a larger pot.
- 6. Each new division should have some foliage (or shoots) and lots of roots. If the plant appears too top heavy trim some of the growth off!
- 7. When dividing iris or other rhizomatous plants, use a sharp, clean knife to cut the rhizomes into pieces, each containing two or three bud eyes. Allow them to air dry for about an hour to heal wounds before potting them up. If dividing peonies, a larger piece of root with more eyes is better, as they take longer to recover. Ideally, peonies should be divided in the fall. If you plan to donate a peony, consider potting it up whole, unless it is very large.
- 8. Try not to include your garden soil with your plants. By using a light weight potting soil, compost or a mixture of these, you will end up with a lighter pot. Fill the space around the root ball with soil mix and tamp down with your fingers to eliminate air pockets and to firmly settle the division into the pot.
- 9. Once potted up, water your divisions thoroughly and place in a sheltered spot, out of sun and wind which will quickly dry out newly dug plants. Water as required, especially if the weather turns hot. After a couple of weeks, you can move the pots into sun for part of the day (early morning sun is best) to harden them off.
- 10. It is not necessary to fertilize your new divisions; in fact it is probably better if you don’t.

From the series "In Your Vege Patch" by Roy Pegler
With spring being a bit earlier, you can plant a row of early potatoes now since there will be little harm, if any, from a late frost. Now’s the time to plant broccoli, cabbage, lettuce, spinach, Swiss chard, leeks and onions. Your green peas should have been in the ground by the end of March, but now is better than never.
Depending on what you want to grow, it’s essential to amend your soil with as much organic matter— well rotted horse manure, garden compost spent mushroom compost or soil conditioner— as you can lay your hands on. Add organic matter to the bottom of trenches when single or double digging. The more you improve soil, the easier it becomes to work and less deep cultivation you need to do. Use it as a mulch on the surface of raised beds.
The benefits of organic matter are many. It acts like a sponge, soaking up water and fertilizer to make them readily available for plant roots. An added bonus is the organic matter itself is full of nutrients. When mixed with soil, the fibres in organic matter create spaces for aeration and drainage so roots can breathe and waterlogging is prevented. When used as mulch, its dark colour absorbs the heat of the sun that warms the soil. This capturing of heat allows an earlier start with spring sowing and speeds up the germination process.
The message is simple— feed your soil with the right ingredients and it will feed you
- Do you have an gardening article to share? Send them in here!
- Try not to get crazy about insects chewing on your plants. If you fret about every little thing, gardening will not be a fun activity. Remember, bugs need to eat too.
- Do not use pesticides – poisons are not fun. They often kill beneficial insects along with the unwanted ones.
- Practice companion planting, e.g. onions and garlic around carrots and other root crops.
- Attract beneficial insects by planting flowers around your vegetable plot. Fennel and dill both attract a beneficial wasp that preys on aphids.
- Become observant. Check for aphids and rub them out with your hand or blast them with the hose.
- Look for cabbage butterfly larvae under the leaves and pick them off. A few holes is not a problem, as it usually the outer leaves that are affected.
- Slugs can be trapped with beer or kept away from vulnerable plants with eggshells.
- Save seed pods of flowers that you would like to propagate.
- Take cuttings of bedding plants like geraniums, fuchsias and heliotrope. Do the same with shrubs and bush fruits, too.
- Prune summer flowering heathers, and give hedges a final trim.
- Pull up tomato plants by the end of the month and ripen indoors any unripened tomatoes.
- Sow winter vegetables (lettuce, swiss chard and kale).
- Order new fruit trees and bushes and prepare soil by digging in compost and manure.
- Remove yellow leaves from water plants. Remove, clean and store water pump.
- Plant rye grass as a cover crop for your vegetable garden to restore nitrogen to the soil.
by Linda Turnbull
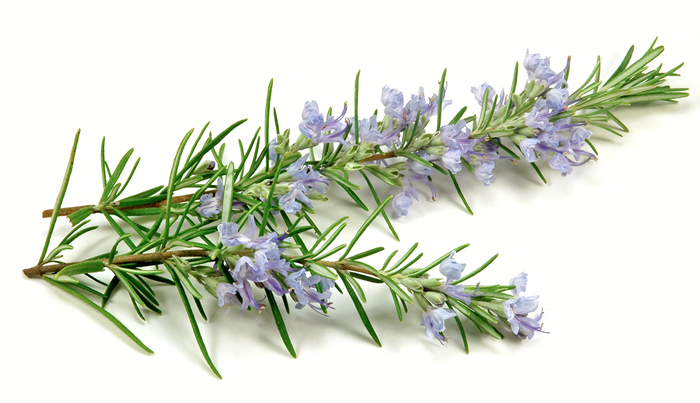
Although Rosemary,
Rosmarinus officinalis
, is quite easy to propagate by seed,
layering and ctti
ngs in water, I prefer to do cuttings in soil. The cuttings can be
done anytime during the growing season. If done early in the year, when planting
your cutting, place it in the ground near the parent plant as you already know
that rosemary grows well in this site. I grow the variety of Rosemary called “Arp”.
It is the most zone hardy. It is a shrub that will grow 5 feet high and 9 feet in
diameter if unpruned. Luckily, it tolerates pruning well. Keeping its shape and size
is easy.
Just follow these simple steps to grow your Rosemary cuttings in soil:
- 1. Take a 6 inch non- fl owering stem and remove the leaves from the bottom 3 inches.
- 2. Dip in hormone rooting powder and shake off excess. Use the appropriate powder (#1, 2 or 3) for your stem type. There is a gel rooting hormone available on the market. I have not had any great success with the product so I cannot recommend it.
- 3. Place 1 or 2 cutting per 4 inch pot of sterile quick draining soil. Bury the stem of the cutting to just below the fi rst retained leaf. Sunshine #4 works well. The soil should be just damp.
- 4. If doing several pots, use a growing tray and dome. If growing just one pot, a two litre clear plastic pop bottle (keep the cap on) works well as a dome. Line the dome or pop bottle for a brief time everyday so mold or mildew does not form. Do not allow the leaves to brush or lean against the plastic cover.
- 5. Place in bright light in the greenhouse or on a window sill. Do NOT put in direct sunlight until your rosemary plant is rooted and established. This may take 2-3 weeks. Once rooted, the cutting will hold fast when gently tugged. If using a growlight, have the light fairly high until the cuttings are rooted.
- 6. Move your rooted plant into direct sunlight or under a bright light. If planting out in the garden, use hardening off methods.
- 7. Do not over water. Rosemary cuttings do not like wet feet and will die if not well-drained. Water well, when necessary; allow water to drain into tray or saucer. Remove saucer and empty. Water only when soil is dry again.
- 8. When planting out, a sunny quick draining site is best. Rosemary is an excellent foundation plant.
- 9. Provide some wind/snow protection, especially in the first couple of years
- Do you have any tips to share? Send them in here!
REGULAR MEETING AGENDA
7:00 pm Meeting begins - Club business
7:30 pm Tea/Refreshments
7:45 pm Draw
8:00 pm GUEST SPEAKER
9:30 pm Meeting ends
EVENTS
Our other events include the spring plant sale, a summer garden tour and picnic, bring-and-share and year-end dinner.
Read morePlant Sale TABLE
We will have an in-club Plant Sale Table with plants & garden related items every month with exception of December.
Read moreMeetings
No meeting in January; Christmas Party in December. Regular meetings with a Speaker all other months.
Read more"If you are interested in gardening and horticulture, this is the club for you!"