Click Here for Information on the New Westminster Nematode Subsidy Program
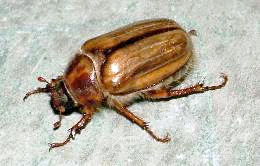
- The chafer beetle is a very large grub found at certain times of year under the surface of your lawn — and it is quite a delicacy for crows, raccoons, and skunks, which will rip through turf to get to them. The majority of lawn damage related to this chafer-fueled feeding frenzy happens in early spring, and can be compared to the results of a rototiller churning through your grass.
- Repairing the damage consists of packing your lawn down, levelling any pitting with fresh soil and sand, and re-seeding with a quality lawn seed. The repaired patches should then be fed with a slow-release lawn fertilizer.
- To prevent chafer-beetle damage in the future, consider a mid-summer application of nematodes, available from your local garden centre. Nematodes are a microscopic wormy-looking creature that when released (and we’re talking about millions of them per package) in water and applied to your lawn, will search out and destroy any newly hatched chafer beetle larvae.
- When deadheading daffodils and tulips only take off the flower heads not the stems, and leave the leaves, ugly as they may be. Try hiding them with something else, like annuals, pots or whatever creative ideas you can come up with.
- Fuchsias with dark leaves and reddish stems can take more sunlight. It is a mistake to think that all fuchsias like total shade. Try your fuchsias in different lights to see where they perform best.
- Look for variety. There are dozens of kinds of fuchsias with different growing habits as well as a wide range of flower colours and sizes. Diversity makes for a more interesting collection.
- Start your fuchsias off with a good drench of fish fertilizer in spring, the moment you bring them outside in March or April.
- For maximum blooms, feed your fuchsias with 20-20-20 liquid fertilizer every two weeks through spring and then 10-15-10 every two weeks during summer.
- Keep plants for another year by bringing them into a frost-free place for winter. When you do this year after year, you end up with wonderful treelike specimens with thick woody stems.
- When you bring plants into their winter quarters, prune shoots back to the main frame. If they are not pruned, they can grow too large and branches can break and split the plant.
- Garlic is a crop that overwinters in our mild B.C. climate, which means you plant in early fall and harvest the following July.
- Hardneck varieties are preferred by B.C. growers as they are hardier when it gets cold, and they produce much-coveted scapes – the edible flower stalks of hardneck garlic. These delicacies are typically harvested in June and can be sautéed, pickled and incorporated into pesto.
- This means your garlic crop has two harvests: the scapes and the bulbs. Garlic prefers a sunny location and compost-enriched soil.
- Once harvested, garlic can be cured and stored for the winter.
- In curing the energy from the leaves goes into the bulbs as they dry. Remove any chunks of dirt from the roots, being careful not to bruise the garlic. Leave the roots on as they have a moderating effect on the drying rate.
If you have a small amount you can spread the plants out where they are protected from the sun and rain and there is good air circulation.
Hang the plants - about 25 to 40 to a string in bunches of 3 to 6. The appropriate number of plants in a string depends on their size and moisture level at harvest. You want the circulating air to be able to reach all sides of all bulbs. Hang the strings out of direct light where it is warm with good air circulation - a temperature of 27°C (80°F) is ideal and two weeks drying time is ideal. This way the bulbs dry evenly and without spoilage. You want the wrappers to dry and the garlic to retain its moisture and oils.
Ideally you want to hang your garlic in an open shed in a breezy location. If you do not have enough air movement use fans. - If you start off growing a healthy cultivar and your crop is successful, you can split your crop and save some bulbs for the next planting
- When the wrappers are dry, prepare your supply of garlic for long term storage or for planting.
We recommend that you select your own seed first. Select good sized, fully mature bulbs with nice plump healthy cloves and set these aside for planting. If you are planting in the fall you do not need to do as much cleaning as you do for long term storage.
Cleaning consists of trimming the leaves and roots and removing the dirty outer wrappers.
If the roots are crispy dry the roots and dirt will come off with a couple of rubs with a glove, leaving a short brush of roots. If the roots have picked up humidity you will need to trim them with snips, leaving 1 or 2 cm (1/2 to 1 inch). For many markets it is acceptable for the roots to be a little dirty - a quick brush with a glove on the trimmed roots is enough.
Trim the tops, being careful not to cut the skins protecting the individual cloves. Leave enough stem on hardnecks to make cracking easy.
The papery wrapping protects the garlic and keeps it fresh. Remove just the dirtiest outer layers of wrappers.
Place the clean bulbs in clean mesh bags or horticulture boxes, well labelled.
- If mesclun and lettuce beds get stressed in afternoon heat, try shade cloth or even a big umbrella during the hottest part of the day.
- If lettuce tastes bitter, water more frequently. Lettuce needs to grow quickly to taste sweet, and does so by never being allowed to dry out and occasional feeding.
- Try not to get crazy about insects chewing on your plants. If you fret about every little thing, gardening will not be a fun activity. Remember, bugs need to eat too.
- Do not use pesticides – poisons are not fun. They often kill beneficial insects along with the unwanted ones.
- Practice companion planting, e.g. onions and garlic around carrots and other root crops.
- Attract beneficial insects by planting flowers around your vegetable plot. Fennel and dill both attract a beneficial wasp that preys on aphids.
- Become observant. Check for aphids and rub them out with your hand or blast them with the hose.
- Look for cabbage butterfly larvae under the leaves and pick them off. A few holes is not a problem, as it usually the outer leaves that are affected.
- Slugs can be trapped with beer or kept away from vulnerable plants with eggshells.
- Save seed pods of flowers that you would like to propagate.
- Take cuttings of bedding plants like geraniums, fuchsias and heliotrope. Do the same with shrubs and bush fruits, too.
- Prune summer flowering heathers, and give hedges a final trim.
- Pull up tomato plants by the end of the month and ripen indoors any unripened tomatoes.
- Sow winter vegetables (lettuce, swiss chard and kale).
- Order new fruit trees and bushes and prepare soil by digging in compost and manure.
- Remove yellow leaves from water plants. Remove, clean and store water pump.
- Plant rye grass as a cover crop for your vegetable garden to restore nitrogen to the soil.

- Sage prefers a sunny spot in the garden and is not overly particular about soil conditions. You can also have great success planting sage in containers. It grows extremely fast, and varieties like ‘Tri-Colour’ are very attractive.
- Harvesting regularly is advised to keep the plant in a firm bushy form. Like most herbs that you're looking to dry, lightly bundling it into a hand-tied bouquet and placing it upside down in a paper bag (crimping the top of the bag around the base of the upside down clump). Hang the bag in a dark, cool room until the leaves have sufficiently dried, which can take anywhere from two weeks to a month, depending on the thickness of the leaves and temperature of the space.
- Harvest sage in mid summer, as this is when it will be of sufficient size following a spring pruning. This perennial herb requires a thorough and heavy pruning (to between 8–12 in./20–30 cm from ground level) in March to prevent it from becoming too sprawling. Depending on the variety, sage can be quite vigorous. A thorough harvest in July—pruning off up to two thirds of the new growth—will allow the plant to flush and produce a second crop to be gathered in September and beyond.
PESTICIDE DISPOSAL:
Probably most of us have uncovered a
stash of pesticides which we no longer
want to use or can no longer legally
use. This is how you get rid of them:
- If your domestic use pesticide has both the poison symbol (skull & crossbones) and a pest control product (pcp) number on its label, it can be dropped off at one of two local depots at no charge: Wastech at 1200 United Blvd, Coquitlam (604-517-6556) or Edmonds Return-it Depot at 7496 Edmonds St, Burnaby (604-527- 0466)
- If you have a small amount of pesticide without its original label, it can be put in the garbage if treated as follows. If liquid, pour it on some cat litter or sawdust until it is completely absorbed. Let it dry completely and then triple bag it and put it in your normal household garbage. If it is a dry pesticide, triple bag it and put it into the garbage. To triple bag something, you put it in a garbage bag and securely seal that bag, repeat with a second garbage bag and again with a third bag. Each bag must be securely closed. Do not put liquid pesticides directly into the garbage.
- Large amounts of pesticide must be handled by hazardous waste personnel (Tervita Corporation, 1-800-667-0444).
Read our full article on Planting Bare Root Roses here.
- Be careful with manure or a high-nitrogen fertilizer when preparing the soil for tomatoes as it will promote lots of leaves and produce few tomatoes.
- Put a teaspoon of Epsom salts in the bottom of the planting hole, this appears to make them more productive and consistent in size and shape.
- Taking most of the foliage off the plants in the first week of August helps to ripen them faster.
- Just after the tomatoes ripen, water them well with slightly salty water. It will improve the flavour.
- Groom indeterminate tomatoes by pinching “suckers” regularly so that the plant will put its energy into making fruit instead of leaves. Keep tomatoes well watered (avoid wetting the leaves!) and fed. If they’re in the ground feed with compost tea, fish emulsion or kelp every two weeks while they’re in active growth. Tomatoes in containers require weekly feeding in order to have good results.
- Do you have any tips for growing Tomatoes? Please share!
- Peas, spinach and radishes can be started ahead of the last frost date, but most seedlings and seeds go out after the last frost date, which in Vancouver is usually March 28, although it has been as early as Feb. 25 and as late as April 10.
- Don't grow too much. The No. 1 mistake beginner gardeners make is to sow too much seed and grow more than they can look after. Sow less and save the rest for another time.
- Keep it simple. Set yourself up for success by growing easy vegetables: radishes, spinach, lettuce, bush beans, broad beans, potatoes, spinach, beets, chard and kohlrabi.
As well, consider gai lan (Chinese broccoli) and komatsuna (mustard spinach). Mescluns (mixed salad greens) do well in containers. - Your veggie patch needs at least six hours of sunshine. Make sure you have fertile, loamy, well-drained soil that is more alkaline than acidic.
- Don’t grow the same vegetables in the same location two years running. This will help reduce pests and diseases.
- Growing a wide range of vegetables promotes a healthier, more balanced environment where pests and diseases are less likely to get out of control.
- Peas like being next to carrots and dislike being next to onions and garlic. Companion planting seems to work. Grow carrots near tomatoes, rosemary next to sage, radishes next to lettuce, peas and carrots, bush beans with celery and beets, corn with pumpkins and beans.
- Do you have any tips to share? Send them in here!
REGULAR MEETING AGENDA
7:00 pm Meeting begins - Club business
7:30 pm Tea/Refreshments
7:45 pm Draw
8:00 pm GUEST SPEAKER
9:30 pm Meeting ends
EVENTS
Our other events include the spring plant sale, a summer garden tour and picnic, bring-and-share and year-end dinner.
Read morePlant Sale TABLE
We will have an in-club Plant Sale Table with plants & garden related items every month with exception of December.
Read moreMeetings
No meeting in January; Christmas Party in December. Regular meetings with a Speaker all other months.
Read more"If you are interested in gardening and horticulture, this is the club for you!"